As the saying goes: A picture paints a thousand words |
Important: Before you learn how to add an image to your article it is recommended you read this first...
Where to get images for your website
To add a picture to an article ensure it is optimised for websites (i.e. not the original large file). A full width image should be 1000 pixels wide and a half width 580 pixels wide.
Even if your image too large, your website comes with a tool that automatically reduces the size of the image for you.
Important for websites that include the facility for visitors to receive articles directly to their email account
Any image should not exceed 580 pixels wide. The only time there might be an exception is if you wish to publish any images full-width. Any images wider than 580 pixels wide should only be published after a read more link (and then no more than 1000 pixels wide)
How to add an image
1. With your article open in the editor - place the cursor where you would like the image to appear (e.g. in a two-column layout in the column opposite the text)
| 2. Now click the Insert/Edit Image button | (in the toolbar along the top) |
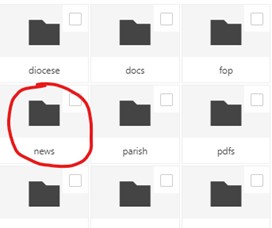
3. It’s best to keep organised and place images in a folder structure so for News or Notices you should select the news or notices folder like this…

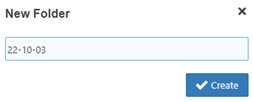
| 4. Then create a New Folder using this icon | on the right and name it yy-mm-dd - so for 3 Oct 2022 it would be 22-10-03 |
like this...

5. then click the Create button
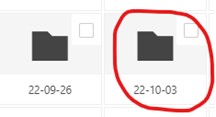
6. Now click on the new folder you have just created e.g.

This is the folder where you are going to upload one or more images for your article.
| 7. Click the Upload | button (on the right) |
8a. Now you have the option to either drag and drop your image file(s) over this space...

| 8b. or click the | button and navigate to the location of your image on your computer. |
| Select your image(s) and then |
You should see you selected image(s) listed, ready to upload
9. You now have the option to resize the image by ticking the resize box and then just the 580 box on the left (you will need to delete the 1000 row)

So after you have deleted the 1000 row it should look like this...

| 10. Now click the | button |
Your newly uploaded image(s) should be listed in bold
11. Click on the image you wish to insert and it will create the URL for the image e.g.
![]()
Add Alternative Text and Title
12. It may suggest an Alternative Text based on the EXIF information of your file. If you need to, edit this – it should be a short description of the image (in a proper sentence) and will be used for the caption.
Tip: For accessibility you should also copy the image description in Alternative Text to the Title field
13. Click on the Advanced tab

and paste into the Title field
| 14. Now click the | button to insert the image |
Creating a Caption
As a finishing touch you can create a caption. This will put a ready-styled frame around the image with a caption based on your Alternative Text. Here's how:
| 15. With the image selected, click the Insert Caption button |
| 15a. (Optional) You can centre the image by selecting the Container tab and then Centre for the Alignment |  |
| 16. Then click |
| 17. And finally click the | button to save and close the article |